Upgrading Single Instance Oracle Database 11.2.0.1 to 11.2.0.2
2/15/2012 05:25:00 PM
Today I'll upgrade my single instance database from 11.2.0.1 to 11.2.0.2. As you know patch sets are full installations so procedure will be like installing for the very first time except choosing upgrade options.
My database takes advantage of ASM. Therefore we'll start with upgrading Grid Infrastructure. Unzip the 3. of the installation zip files to an appropriate directory such as /tmp. Since 11gR2, upgrades must be done as "out-of-place upgrades". So create the directories for grid and database upgrades.
If you don't show an empty home to installer you get the following error:


Select the new directory as software location. After prerequisite check (nothing came up hopefully) installation will begin and you will be prompted to run root script:


Grid Infrastructure upgrade is completed when the script is finished. You can check the new version by:
Next step is upgrading the database. Unzip the first and the second of the installation zip files and run the installer.


Select the edition you want to install.


When you click "OK" when the script succeeds, Database Upgrade Assistant (DBUA) automatically starts.


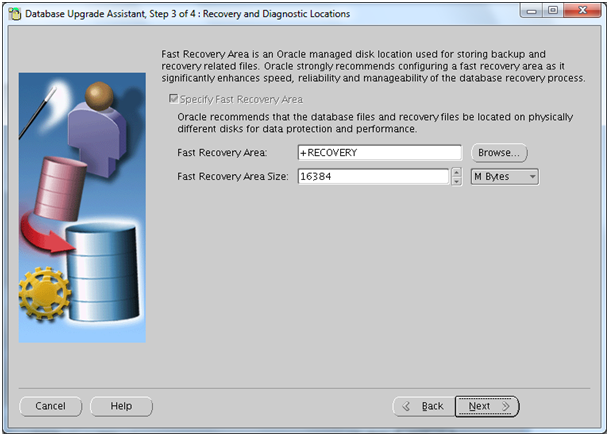


At the end a result report is generated.
The whole procedure is pretty much straight forward and goes smoothly.
How to change password of users sysman and dbsnmp for DB Console
2/13/2012 06:28:00 PM
For security reasons or you just forget about password expiration and users got locked, you may need to change passwords of users: sysman and dbsnmp. It is not as easy as changing as user's password, but it's so hard either. Here are the steps:
1. Logon to your server as software owner, probably oracle
2. If ORACLE_UNQNAME is not set properly:
3. Stop DB Console
4. Open SQLPlus as sysdba
SQL> conn / as sysdba
SQL> alter user sysman identified by new_password;
SQL> alter user dbsnmp identified by new_password;
If user(s) got locked:
SQL> alter user sysman account unlock;
SQL> alter user dbsnmp account unlock;
5. To change sysman's password for DB Console edit config file:
If it is a RAC environment
$ cd /u01/app/oracle/product/11.2.0/dbhome_1/<node_name>_<db_name>/sysman/config/
If it is a single instance:
Open emoms.properties file with your favorite text editor and change the lines:
orcle.sysman.eml.mntr.emdRepPwd=newplaintextpassword
orcle.sysman.eml.mntr.emdRepPwdEncrypted=FALSE (Change it from TRUE to FALSE)
Don't worry because of writing password in plain text to a file, all the password you've written down will be encrypted and the property emdRepPwdEncrypted will turn into TRUE again when you start DB Console.
6. To change DBSNMP's password:
If it is a RAC environment
If it is a single instance:
Edit targets.xml file for every appearance of statement below, except the one for ASM.
Change encrypted from TRUE to FALSE
<property name="password" value="new_password" encrypted="FALSE">
It's the same case for plain text and encryption just like previous step.
7. Start DB Console:
8. You can check the files you edited to see passwords got encrypted.
Backing up Exadata Storage Cell
2/09/2012 04:59:00 PM
$ imageinfo
Kernel version: 2.6.18-194.3.1.0.4.el5 #1 SMP Sat Feb 19 03:38:37 EST 2011 x86_64
Cell version: OSS_11.2.0.3.0_LINUX.X64_110520
Cell rpm version: cell-11.2.2.3.2_LINUX.X64_110520-1
Active image version: 11.2.2.3.2.110520
Active image activated: 2011-06-24 00:04:28 -0700
Active image status: success
Active system partition on device: /dev/md5
Active software partition on device: /dev/md7
In partition rollback: Impossible
Cell boot usb partition: /dev/sdm1
Cell boot usb version: 11.2.2.3.2.110520
Inactive image version: undefined
Rollback to the inactive partitions: Impossible
What is left for you to back up is just a couple files listed below:
1. /etc/hosts
2. /etc/modprobe.conf
3. /etc/sysconfig/network
4. /etc/sysconfig/network-scripts/*
Exadata turns your USB disk into a bootable disk of active image of your system.
How to Display X Client on Oracle Linux to Run DBCA
2/08/2012 06:09:00 PM
As a best practice, Oracle recommends creating new databases by using atabase Configuration Assistant (DBCA) tool. Since DBCA is a graphical interface and if your Oracle runs on an Oracle Linux installation without a desktop environment what you need to do is explained right below:
1. Install Xming on your Windows desktop. During the installation select the "Don't install an SSH Client" radio button.
2. Run Xming
3. Assuming that you're using Putty, click "Enable X11 forwarding" and set "X Display Location" to "localhost:0" as displayed below:

After you logged on to your server you can run DBCA and a new window will be opened on your desktop.
RMAN-03009 and ORA-00245 on 11g R2 RAC
2/07/2012 01:52:00 PM
RMAN-00571: ===========================================================
RMAN-00569: =============== ERROR MESSAGE STACK FOLLOWS ===============
RMAN-00571: ===========================================================
RMAN-03009: failure of backup command on x channel at <sometime>
exit;
ORA-00245: control file backup operation failed
Backing up Infiniband Swithes
1/28/2012 05:49:00 PM
If you're an Exadata admin, your title becomes DMA (Database Machine Administrator) instead of DBA. Since backups are routine tasks of every DBA, scope of what to backup extends a little bit when it comes to Exadata. Beyond the databases, you need to backup hardware also.
So, let's start with infiband swithes. Before configurations changes or updating its software it's a good practice to backup them. There are 3 things to backup and actually it's a really simple thing to do.
Here are the steps for firwware version 1.3.3:
1. Login to switch's ILOM interface. There should be an https address for that
2. Click on the "Maintenance" tab an then "Backup/Restore"
3. Select "Backup" as operation and "Browser" as transfer method from the drop downs
4. Write a passphrase
5. Click "Run" button and save the XML output.
6. For the next item to backup logon to switch through ssh
7. Take a backup of the file opensm.conf under /etc/opensm/ directory to somewhere else.
8. Last to backup is the output of the commad: version
Don't forget to repeat steps for other infiband switches too:)
Recreating the spfile on ASM from pfile
1/26/2012 05:23:00 PM
You may face with one of the errors below or such while you are starting your database, probably after you alter some parameters' values and restart.
- ORA-15124 : ASM file name '...' contains an invalid alias name
- ORA-01078 : Failure in processing system parameters
1. Logon to your server as Oracle owner, such as oracle
2. Get the spfile from ASM:
File is saved as /u01/app/oracle/product/11.2.0/dbhome_1/dbs/init<DBID>.ora over pfile by default.
Alternatively you can specify the output file by giving pfile='/tmp/pfile.ora' option to the statement above. If you don't, it's better backup your original pfile.
3. Change what is wrong in the pfile with your favorite text editor
Note: If there is, remove the line "spfile='+DATA/<DBID>/spfile<DBID>.ora'" at the end of the file. If you don't, Oracle read the spfile in ASM as it's set in that line.
4. Create a new spfile from the pfile you have just edited:
SQL> SHUTDOWN IMMEDIATE;
7. Change the pfile back to its original state by restoring pfile backup you got in step 2 or create a new one. Its contents should be like:
spfile=’+DATA/<DBID>/spfile<DBID>.ora’
(Backup the new pfile you created first, just in case)
8. Start your database
If it's a RAC:
$ srvctl start database -d <DBID>
Otherwise:
SQL> STARTUP
9. See that the spfile being used is the one in the ASM:
SQL> SHOW PARAMETER spfile;
That's all...


 Posts
Posts

